
Feedback from my proof of concept, consisted of the film not making clear sense to the audience watching. I therefore made sure that I would research into direction and cinematography further than other elements, as I believe doing this would be my best chance of improving from my past mistakes. I received minor comments also about the sound. I believe sound is a drastic part in the quality of a film, as without audio, the film would make less sense. As known from previous comments, making sense is one thing in which I solely wish to achieve in my final film.
Textual Analysis:
After completing and understanding the plot of my film, I have chosen to research two thriller/drama films with a vast difference in budget. With one of the films being a Hollywood production, whilst the other is a student project. Doing this will help me establish the difference in techniques from both films, and how the bigger production prevails with aspects such as script, acting and shot types. I have chosen these films due to their relevancy and to use them as a guide to gain the suspense I intend to achieve in my film. I also believe that they consist of the necessary elements to drastically improve my attitude and knowledge towards production.
Taken (2008):
Due to this film being feature length, I have decided to analyse a scene that best suits the plot and style of my film. I have decided to analyse the direction and camera work, as I believe that this excels in how much it would improve my project.
The scene I chose portrays the suspense I am aiming to achieve, as well as the specific moment of realisation as to the the identity of the person on the other end of the call. It is a perfect example of the suspense strike I wish to achieve in the final scene of my film. With a large build up, I can only wish to please the audience and not disappoint with my final scene, which is why I am making it a vast part of my research.
Direction:
The direction of this scene is intended to display the hostility and atmosphere of the room. This is done by having an antagonist at every angle in order to display the protagonist getting surrounded before the action even commences. For example in the screenshot below, there are 3 people at the table, 1 person in the foreground and 1 in the background. This demonstrates the helplessness of the main character, as he stands alone directly in the middle of the shot. Direction is key in films like these, due to the actors having to obtain the knowledge of where they are meant to be at all times. This will therefore lead to a well choreographed fight scene, adding realism throughout.
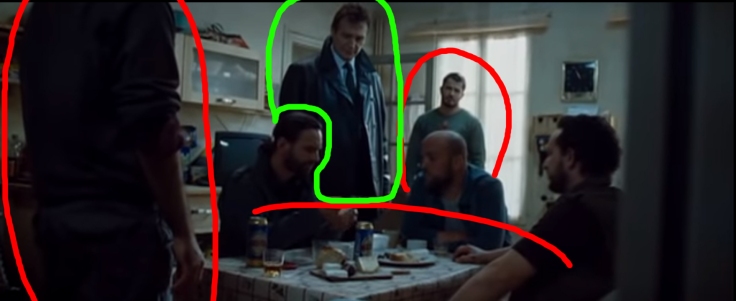
The general attitude of Neeson in this scene is calmness, portraying his knowledge that he remains superior to those in the room. This is evident in how he is controlling every shot he is in, as he remains in the center of the shots containing all of the characters. I wish to portray the helplessness of the main character in this fashion, without the added part of him defeating all of the other actors. By showing the main character standing alone, I will display his strong willed manner. Showing him as this powerful, independent character will later create a bigger effect the audience. This is as they will see his drastic fall in confidence after suffering the following events of the plot. Another element of this sequence is how clear Neeson’s voice is compared to the antagonists. Insisting that my actor speaks with a clear and strong tone will also develop his character further, into the tough exterior that the audience see. This is all to arise the demeanor of the character and to shock the audience with his downfall.
Camera:
Camera shots and angles are a major point to focus on whilst attempting to create tension or show the audience what might be about to happen. There are different angles to show the audience the hostility and tension of the situation.
For example:
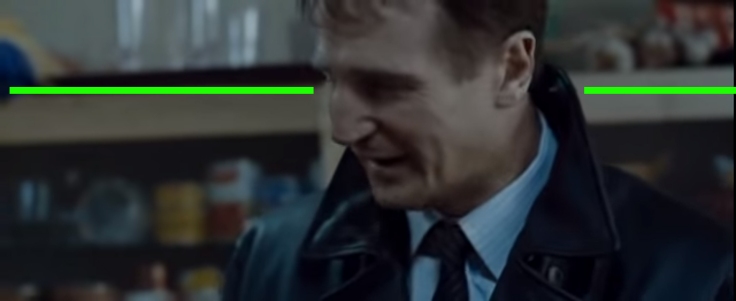
No hostility, balanced camera
Hostility, looking down, looks superior
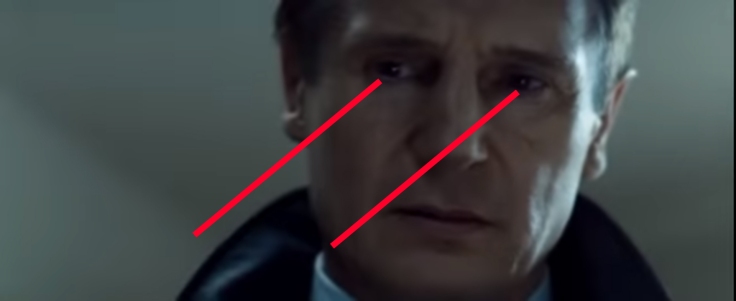
The general cinematography of this scene perfectly fits every action that follows it. The camera position is based on which emotion the characters are feeling, such as the hostility section shown above. There are many closeups as this scene decides to portray tension with emotion. The actors show how the scene will unfold. When the suspense strikes, we see many further out shots, to give room for the stunts of the actors. The shots however, are not lit specifically to show suspense. This is as they are well lit to provide vision for the fight scenes, rather than having the audience try and see a dark action sequence. The whole aim of cinematography in this part is to demonstrate the actors emotions rather than the setting around them. This is what I wish to portray in my film. I will set my film during the day to ensure that I can develop character emotions with well lit reaction close ups. I would also wish to include different types of camera positions to attempt the hostility trick used in this scene. I wish to include the reaction shot as the final shot of my film, similar to that in the Taken scene. This will be used when the character realises who he has killed.
Pocket Knife (2016):
I decided to analyse this project as it relates to mine in the fact that is a small no budget film. It also will assist me on developing tension in my project, as this is a film solely based on suspense, as seen in the title. The film was made by two students, simply just for personal pleasure of production. The plot displays a young man obviously with something on his mind when he wakes up. He is shown holding a pocket knife which hints to a later event. There is then an extremely tense scene in which he locks his friend in the car with him whilst holding the knife, before offering him a challenge. It perfectly depicts how to create tension without relying on insane special effects or crazy events happening.
Direction:
The direction of this product is done immensely well. With the actors knowing what to say and when to say it in order to add to the ever increasing tension. The general theme and plot isn’t extremely complicated, which is enjoyed by most viewers as it is easy to follow. Being a simple film allows it to further focus on the one main scene to ensure that it is of perfect quality. The simplicity of this project is something that I only admire and take inspiration from, due to it’s effect on the quality of the whole film. There is not much to discuss in terms on direction, however there are main factors that I wish to use in my own project. For example, I will take inspiration from the techniques of suspense building. These range from the dialogue chosen, the delivery of that dialogue and the emotion reaction shots. I also admire how the character is shown in a position of power, even when sitting in the exact same type of position as the victim. This is done with the use of the prop pocket knife, as well as the delivery of each moment of acting.
Camera:
The camera work of this project is something to also admire the simplicity of. I, as a viewer, enjoy the fact it is well lit and suits the style and flow of the film. I believe that the best way to take inspiration from a film, is to watch it as a general viewer and see what I enjoy and take from it. For this film, I specifically enjoyed the shots in which the main character was developed. Shots such as the one staring at his pocket knife are great examples of how simple it is to portray such a meaningful message. this shot demonstrates how a cinematographer can make the audience think about the characters thoughts and what he is about to do. The camera shots are all stable, showing a balanced entire film. This shows the calmness of the madness pursuing, as well as how the characters emotions have overruled his body into the calmness of a psychopath almost. Other main notices of the cinematography, were how it nicely varies from close ups of each character speaking, to their reactions of the other characters dialogue. This allows the audience to get a feel for the characters thoughts and it is a type of shot I wish to pursue to create in my own film.
Secondary Research:
Techniques:
Sound:
This video demonstrates and discusses sound and how it should be used. “By design, you are not meant to notice sound because good sound design is meant to be matched so perfectly to the visuals, that they go unnoticed”. This explains how sound should be a huge factor in post production, to the extent that the audience wont even realise. This states that the only sounds that are really noticed, are that of bad quality. This is what I wish to achieve in my film. I wish to create that visceral realism that fight club entices its audiences with. This video also goes into deep detail of what it takes to create realistic foley fight sounds. It entails how they experimented with chicken carcasses filled with walnuts, in order to create that bones in flesh crunching sound to support the gory visuals. This may not be something that I attempt in my project, but it doe give me a path of possibility if I do require those sounds. The inspiration that I could take from this is the importance of sound design and how it can “make or break a film”. Carrying this attitude into my own production will allow me to stand out from the other projects with something that will appear so subtle.
Editing:
I wanted to watch this video as I wish to create an action scene in my film and I believe that the editing of that scene will allow me to create it a step up in quality from a normal scene. I also believe this scene will be where I can show off to the audience and flaunt my editing experience in order to achieve a better standard final product. One of the techniques used is speed remapping. This is used to increase the speed of an attack thrown in order to increase the realism and feeling of that attack. It allows punches and kicks that look less realistic to still be used in the project. It also blinds the audience from the fake part of the attack as they can never see when it actually misses the target. This adds also to the intensity of the scene. Another technique used is to delete a frame just before impact, and move the clips together. This adds to the snap of the punch, as well as providing for a great unnoticeable mask on the impact. These are all techniques I wish to use in my project, as well as importing my own. I believe my own techniques of colour grading and motion blurring, will provide for a great quality final action scene that will excite the audience.
Camera:
Camera angles are a must in terms of creating suspense, portraying action and developing characters during the storyline. I have decided to analyse this video as I believe that it will give me an insight on to what it takes to achieve power with a camera. Camera angles allow the audience to know who is in control of the scene and who is not. For example, a flat camera angle displays how there is a lack of power structure in this scene, as none of the talents have yet taken control of the scene. It is a way to develop characters evenly, without portraying one to behold more power in the scene. This may be useful to me as I do not wish to show the first character with power in the immediate scenes. This is due to the fact that he is a protagonist caught in the midst of the action, rather than forcing it upon himself. Therefore, I do not believe that he should hold a position of power during these scenes. This may however differ in the later scenes. I believe that I will choose a low camera angle in the scenes where the antagonist is speaking, as I think that this would better demonstrate his position of power towards the protagonist. A high camera angle may also be used on either the protagonist or the victim, as they hold less of a power than the rest of the characters due to their role. Showing these characters with diminished power and lack of control suggests early to the audience that these are the characters suffering the bad fate.
Lighting:
Lighting is fundamental when it comes to adding some sort of emotion into a scene. It opens up a vast array of possibilities of what can be shown to the audience. For example, sad lighting such as a deep blue may be used to show the audience the sadness of the scene, possibly a character suffering loss or maybe something else. This video below demonstrates how to create lighting not to portray emotion, but to improve quality and production value of the film. It shows how a scene can change from looking like a college project, to looking like a Hollywood film in less than five minutes. The main factors to achieving this aesthetic are to avoid having light directly opposite the camera. This may diminish the quality of the shot itself, as well as distracting the audience from the actual subject of the shot. By adding a backlight to the ear after darkening the rest of the face, adds the touch that it is not pitch black and it is clear that the character can still see. It also perfectly outlines the structure of the face, allowing the actor to portray emotion more clearly to the viewer. I wish to use this technique in my project for when the protagonist is sitting still and reminiscing about previous events. I believe it will give the audience an insight into the head of the character, as well as showing them that he is suffering from the pressure of what he is being told to do. I wish to make lighting a necessity in my film, as watching this video has set the though in my brain to not underestimate the possibility of what lighting can do to a scene.
After making lighting a necessity, I wanted to make sure that I knew more about it than just one tutorial. After thorough research of lighting, I selected this video to analyse deeper as I believe it tailors best to what I wish to create. This video delves into more about creating depth, to avoid consistently including flat visuals in my scenes. Depth is what helps images appear more cinematic and helps them pop out from the screen. I believe that visual stimulation of high quality is a definite way of ensuring the audience stays watching and doesn’t lose focus from the film. Using key lights in my film will allow me to create these types of effect so I need to ensure that I book these out prior to filming. This video goes through all different types and techniques of lighting such as “loop lighting” and “paramount lighting”. All of which are effects that I could possibly use in my project. Having some sort of shadow structure to my imagery is key in developing the dramatic and cinematic look that I am aiming for in production.
For this video, I decided to do some experimenting. These experiments were done with photography, so I could grasp some sort of knowledge on how to set the lighting correctly, before jumping into a set environment and filming. I believe experimenting would give me experience, as well as an insight into how to create these effects that can vastly improve my own film.
Primary Research:
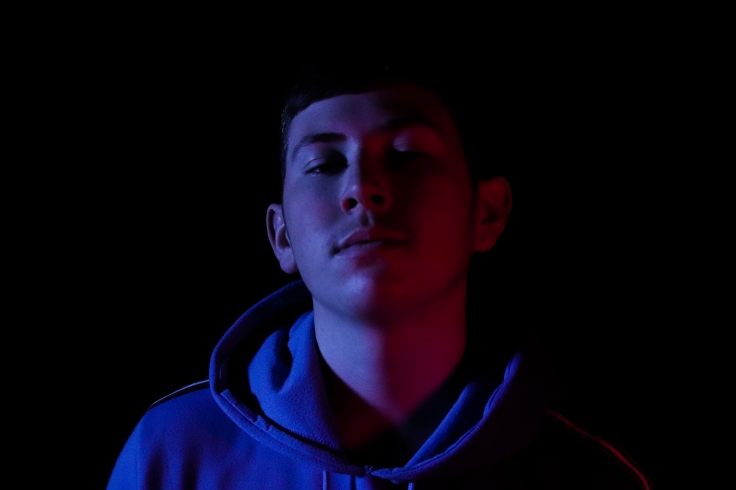

The first photo is designed with colour on each side of the shadows on the character instead of tradition black shadows. This was done in an attempt to create police siren lighting. Large lights were used on each side, both covered with the coloured filters, whilst a small key light was placed above and to the left of the talent. The key light was placed to compliment the shadows next to the nose, hiding part of the face to provide for that cinematic and creepy appearance. This photo not only sets the scene of a dark and unknown place, it also sets the fact that police are involved. This is what I aim to achieve in my film, to demonstrate to the audience a crime or act of violence has just been committed, whilst the talent revels in his demise. Doing this in my film will allow me to develop the character even further, as the audience can see the emotion, or lack thereof, in his face in the shadows. The hood being down also shows that the character is almost proud of whatever it is he has done, showing his face clearly to the audience with a smirk.
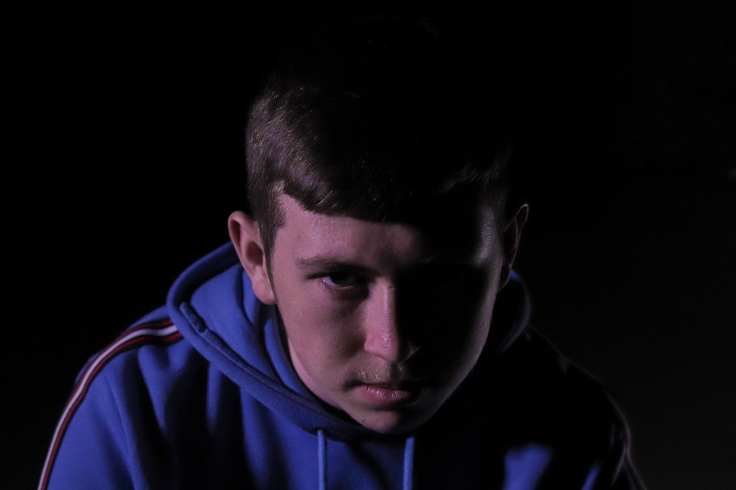
The second photograph however, proves more mysterious to the first. This is in an attempt to show to the audience that he is hiding from something or someone. The fact he has his hood up with a shadowy face demonstrates his wish to be hidden whilst suffering from something or feeling down from emotion. The shadows lie on the hood rather than his face, displaying that he has a clean face and means no harm, whilst the hood on him forces something different. This photo was done to show the audience the burden being put on him, appearing as a criminal from behind, but his face suggests innocence. This shot was achieved simply with one strong light from the side facing towards his face, as well as a small key light behind him to show the shape of the rest of his body. The strong light provides for the clear face and shadows on the hood, whilst the key light supports the rest of the figure in the image. Showing the shadow on his back shows what the audience see, when the character wants to be seen in a different light, literally.
The final photo in my opinion, is my favourite. This is because of how it demonstrates both of the two sides of the character. The light and the dark side, the good and the bad. The left side of the face displays innocence, whilst the dark side displays threat and the unknown. This is perfect for my storyline, in which the characters hidden side is released towards the end of the project. This effect was done after following the tutorial from the second lighting video. Using a large light on the left side of the screen, providing for the clear side of the face which then provides for the shadow. The small light on the right is used to develop the rest of the talents face so the structure is clear rather than hidden. This technique allows the photo to make sense and his whole head is visible, whilst providing that mystery that the drama film requires. I think that if I decide to add an optional final scene to my film, I would intend to use this technique. This decision is purely based on the effect of the image and the meaning behind it.
Survey:
I also created my own survey on survey monkey in which I asked the following questions:
- Have you ever been peer pressured?
- What is your favourite drama and how did it make you feel?
- What would be the best setting for a teen drama?
The answers I got to these questions were extremely helpful in my preparation for the production of the film.
The first question was asked purely to gain an understanding of how many of my audiences have suffered from peer pressure. This allows me to gauge how my audience will feel about the production of this film and weather I can spread the message of how many people are suffering from it. The answers I gained were surprising at 2/4 answerers stated that they have suffered from peer pressure. This may not be a high and reliable number, but it does prove that peer pressure exists, especially in todays youth demographic. Knowing this, I will know be able to know that some of my audience can relate to the film.
The second question was asked so I could find out what films I could gain inspiration from that would make me again able to relate to the audience. I also asked how it made them feel. This is because I wish to gain an understanding as to the emotions that I should attempt to make my audience feel. “Logan” was one of the answers. This shows to me that audiences enjoy films that can make them feel the emotions of the actors. This is because Logan is a film in which character development is at its peak. Audiences enjoy seeing the emotions of the actor and feeling them with them. This is therefore something that I aim to achieve in my own film.
The last question was asked so I could get assistance in finding out where would be best to set my film. Most of the answers were “my house”, probably due to the ease of access as well as realism. Filming in my house would be an easy option to display the life of a teenager, due to the fact I am one myself. Another answer was “McDonalds”, partly due to its popularity with teenagers. This however, would prove difficult to film in as staff do not appreciate people who aren’t customers taking space up. Outside McDonalds however, may be a possibility for one scene. It may also add to the realism of the project.
Conclusion:
I think that taking all of this information in with me into production, will assist me in creating my vision. With previous critiquing on my proof of concept, as well as my sums of research, I believe that I am fully prepared for production.

Corey. There is very little on this research post. You need to look at a range of different research topics, primary and secondary and use different sources. Get some books out, do some experiments and write this up. You should be starting the planning the week you get back at the latest from Easter hols so need to get this done over the next two weeks. Remember to use the following questions when you write about each topic:
What did you want to research and why?
What sources have you used?
What did those sources say?
How will you test your findings?
How will this inform your production?
Remember document everything that you look up, write it up and show how it links to your production.
LikeLike